UT3: Vertex color blending variation
This tutorial will cover a method shown on a fellow artists web page for adding variation to the transition point of your mesh which has vertex texture transitions, however it will go more in depth with the shader and how it works. There are a few minor changes as well.
I reccomend you take a quick glance at what he has created on this site, it is an extreamly powerfull method for adding detail to your vertex color transitions. The method he created looks great, but i will cover why this does what it does as well as things to look out for that were not covered in this method. Aldo, i should point out something that is not covered in this tutorial.
If you want your transition to animate, simply place a 'Panner' node in front of both of the 'cloudy' textures you see in the image directly below. It will take a bit of playing around with to get the speed and direction right, but this can give you some great results at a cheap cost depending on what you're wanting to do.
An example of this could be an alien created entirely out of a smoke, and its arms, legs, wings or whatever part you want to have this effect can have an animated transition and animate as the character moves.
This is the final result for the shader netword covered by 'Hourences' with a few minor additions.
In order to view any kind of results, you will need to create a piece of geometry with vertex colors on it. If you are not sure how this is done, you can follow this tutorial created by 'Hourences' linked below.
Next you will need a black and white texture that will give you variation and that repeats seamlessly. This texture can be nearly anything since we will only be using one of the RGB channels.
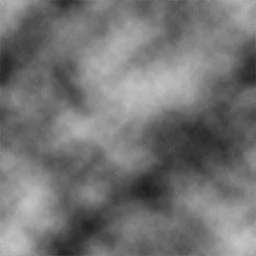
This texture is used to add variation and detail in the transition period of the shader. What you see on the left is simply a 'cloud' Filter created in photoshop.
Next we will be creating the material you see located in the link above however this will be done step by step and show you visually what is going on as we proceed.
Once these two steps are done, import them into unreal and set everything up to begin creating the material.
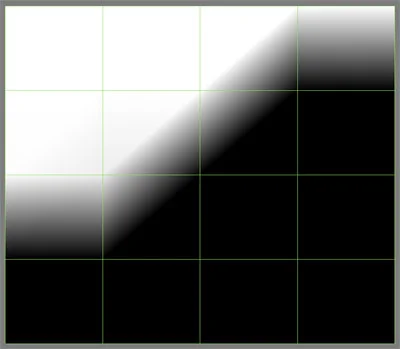
To visually see things clearer we will be setting up the most basic vertex settings possible. For right now, make the shader look like the image below.

The red channel of the 'vertex color' plugged into the 'Alpha' of the 'Lerp' node is the most basic setup, however the red and green will be replaced with textures. For this tutorial i will simply use these colors to allow for easy comparisons.
Please note that i will show a screen shot after every description to make it easier to follow and compare as we go.
In your shader network, import the 'cloud' texture you have and 'multiply' it by the 'vertex color'; We will then use a 'Multiply' with a value of '4' to bump up the intensity. This is how these changes will affect the network.
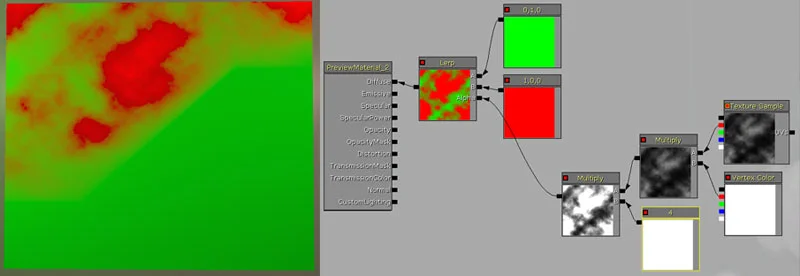
So far we are only altering the white value of the netword, the reason for this is because when we multiply the texture by the 'vertex color', the black values of the geometry remove any white information of the texture itself. (basic math: 1 x 0 = 0 In this example, 0 represents black)
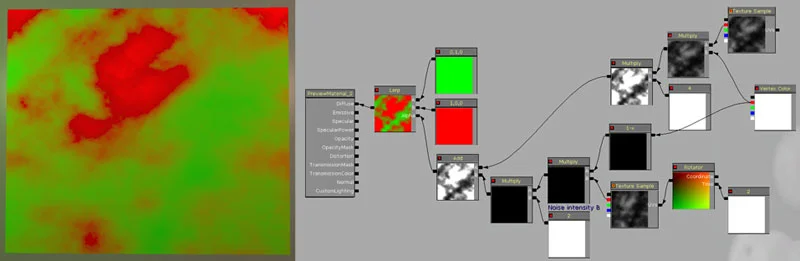
Next we need to tweak the black value of the shader. We will be doing basically the same thing as above with a few minor tweaks.
First we need to invert (OneMinus) the black and white texture so any 'multiply' values we apply will change the intensity over the black. The Rotation applied to the texture is to add variation to the shader itself and the 'constant' variable set to 2 is plugged into the 'Time' channel to makes sure the rotated value does not change over time. And finally the 'multiply' value is set to 2 simply to add variation compared to the first step we did. This is how these changes will affect the network.

If you realise, in the image above i have disconnected the first step we did. They will be combined together in the next step, but to show what this shader did, i linked in only the step we just finished doing.
To combine these two pieces together, we will be using an 'Add' node. It does not matter which 'multiply' is plugged into which channel of the 'Add', the result will be the same. This is how these changes will affect the network.
The next step is to add in the 'vertex color' into the current shader. This is where you will notice the biggest change.
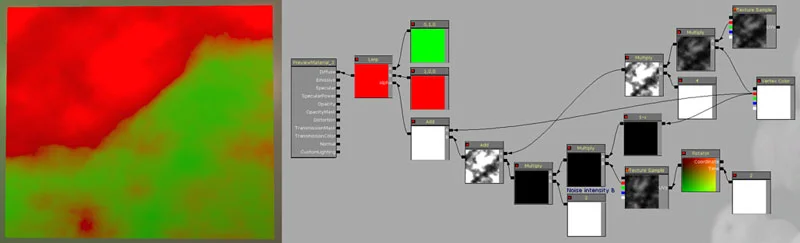
As you can see, the red is entirely red and the green is mostly green. This is where 'Hourences' tutorial ends, but allow me to show you a major problem. Since we are multiplying black and white colors over and over plus adding them to one another, this is the final result we get when textures are applied.

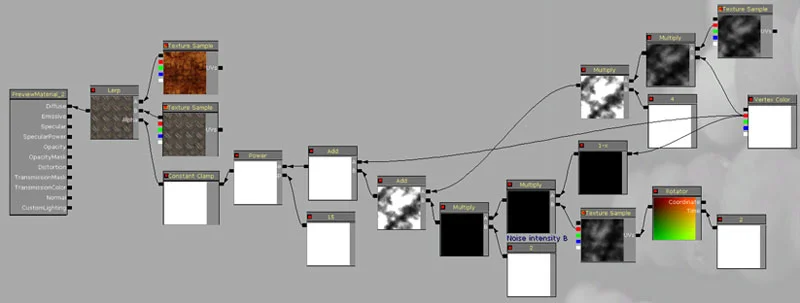
As you can see, the texture plugged into 'Lerp A' seems fine for the most part, but the texture plugged into 'Lerp B' is over exposed; This is caused by the white value being 'added' into the alpha of the lurp. Currently this white value is WAY over the 100% white mark, causing the colors to change in this way. Also notice how the colors bleed over on the bottom right side of the final render. In this area i do not want to see anything but the texture plugged into 'Lerp A', Also there is no way to controll how tight the transition is from one texture to the other. If you change the 'constant' values in the shader, you will notice slight changes, but they mostly push the texture back and forth a bit.
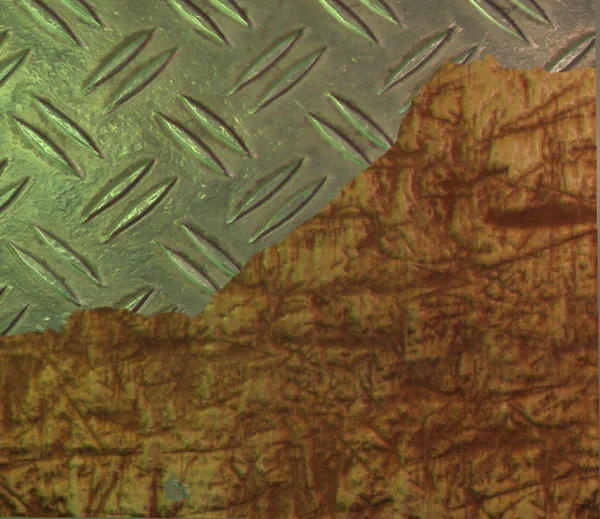
In order to fix these major issues, all you need is a 'Power' node with the 'Add' plugged itno the 'base' channel, and a 'Constant' with a value of around 15 for now plugged into 'Exp'. What this will do is tighten the transition between the two vertex colors, however the colors will be even MORE intense. To fix this, create a 'Constant Clamp' node as a buffer between the 'Power' and the 'Alpha' of the 'Lerp'. What the 'Constant Clamp' does is it limits the values heading out, so nothing will be below 100% black or 100% white. This is the final result you achieve.

I should note that by changing the 'Constant' value plugged into the 'Power', you can change the fall off of the two textures. A value of 1 will have no affect, and i don't recomend doing below 1, however the following images are screen captures with the values displayed in the bottom right corner and their resulting appearances.
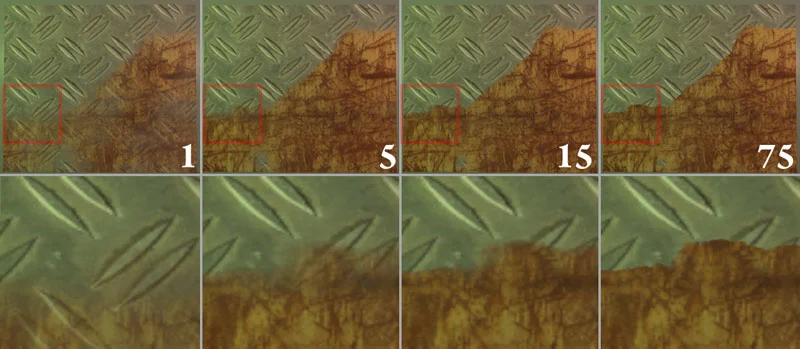
As you can see, the higher the number, the tighter the transition. It still conforms with the painted vertex colors, but there is variation in it now. Pick the setting you are wanting to achieve.
Despite the work we have done to this, the result is still terrible simply because there are no normal maps or spec maps applied to it. Simply lay out your shader for these channels the same way you did for the diffuse. Make sure that the correct spec and normal map textures are plugged into the correct channel for the Lerp.
This is the final render and the shader network i have created.
Make sure the 'Constant Clamp' is applied to each of the lerps, otherwise the textures will not match up.
This is a screen shot of the same shader, before and after, of a very simple sphere.

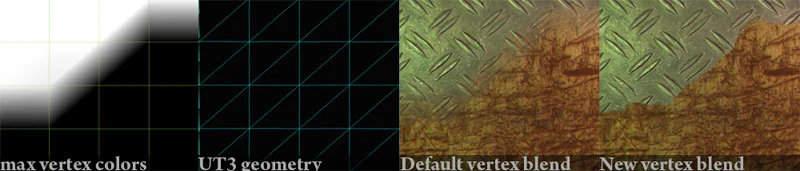
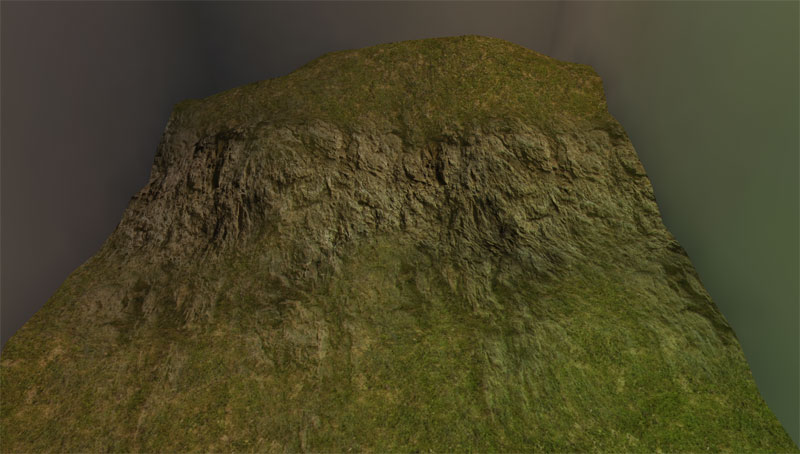
Lets try puting this to some practical use. Lets say you want to create a hill of grass with a rock face part way up. First you need some geometry with vertex colouring applied to it.
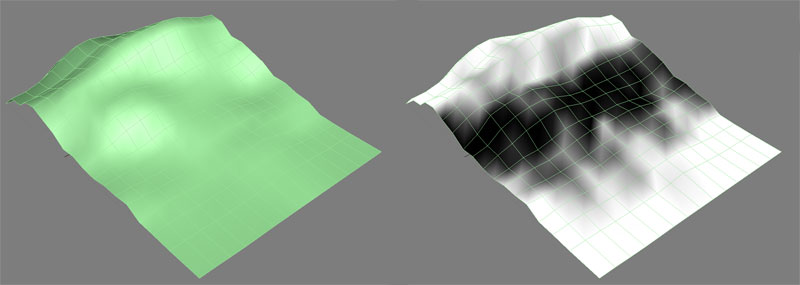
In the game engine with the default vertex blending, this is the result you will get.
If we apply what we just went over to this geometry, this is the result.
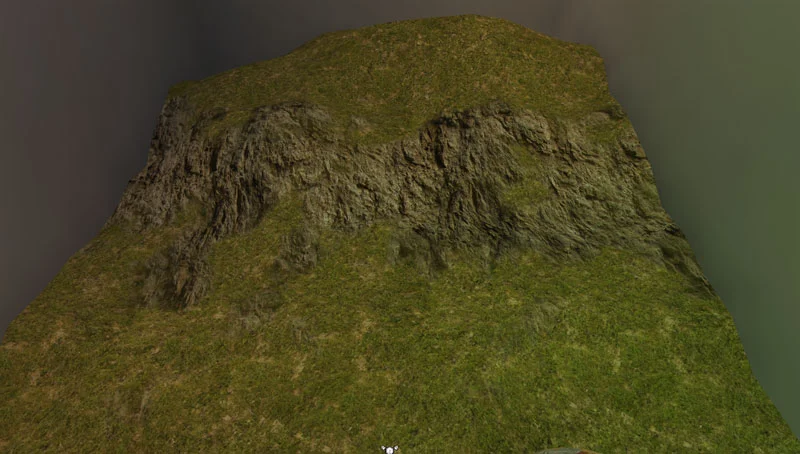
As you can see, the transitions are now much sharper in comparison, but what if you want the transition to be smooth and add some 'pockets' in the middle of the rocks so they look more speratic.
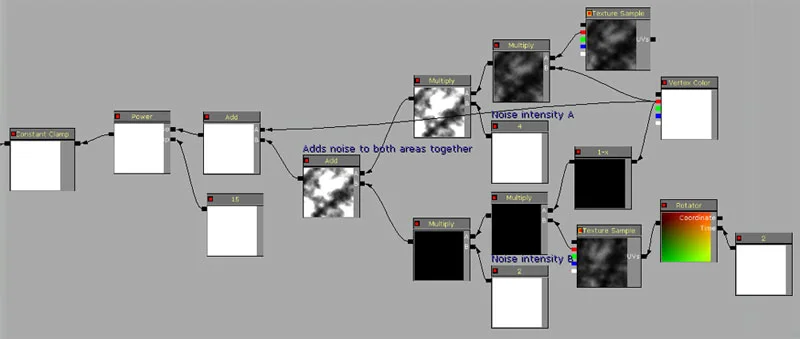
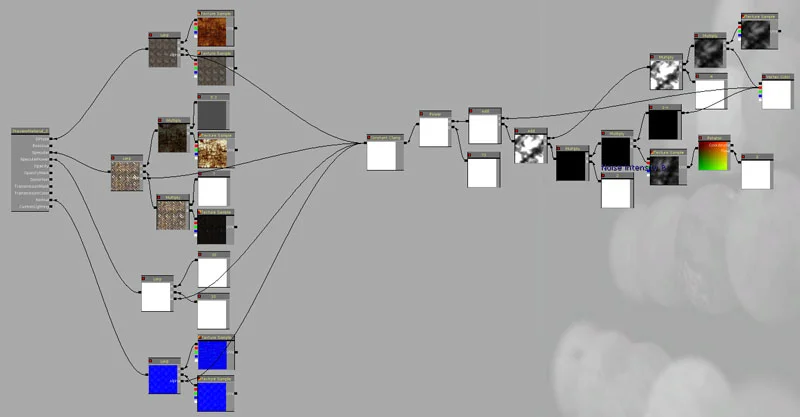
Set up your network so it looks something like this.
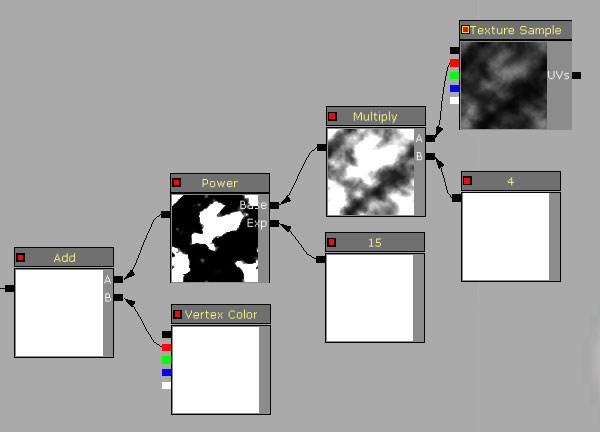
This shader setup does what the first one does in a way. The texture is used to add details, but in this example it is only for the 'black' vert colors, and instead of adding variation on the edge, it erases the texture based on the 'cloud' texture itself where the black verts are painted.
The #4 on the 'Multiply' controlls the size of the erased textures.
The #15 on the 'Power' controlls the sharpness or fall off of the textures.
This is the result you will get.
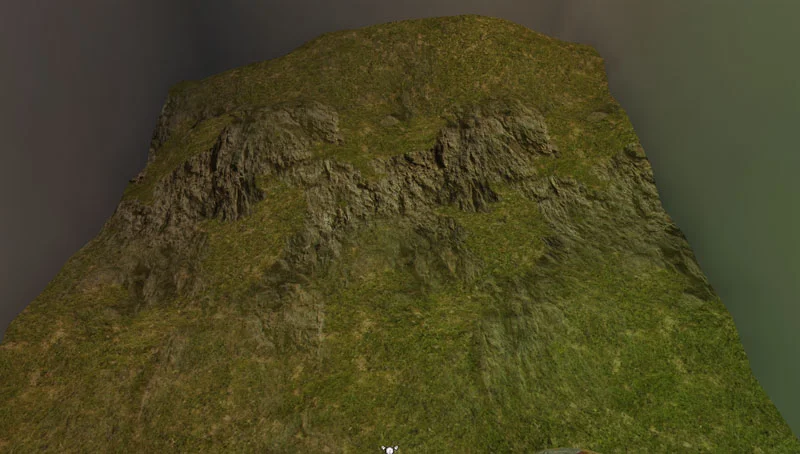
By changing the values of the 'Constant' nodes plugged into the 'Multiply' and 'Power', you will get different results as shown above. Play around untill you find something interesting or that'll work for you.
Also, if you want to, you can use the diffuse texture of the rocks itself to controll what is visible; This option would work best with the first method. Here are a few screen snots taken to compare the different results you can achieve.
The first images use the most recent method covered in this tutorial.

These images use the first method covered in this tutorial.These images use the first method covered in this tutorial.
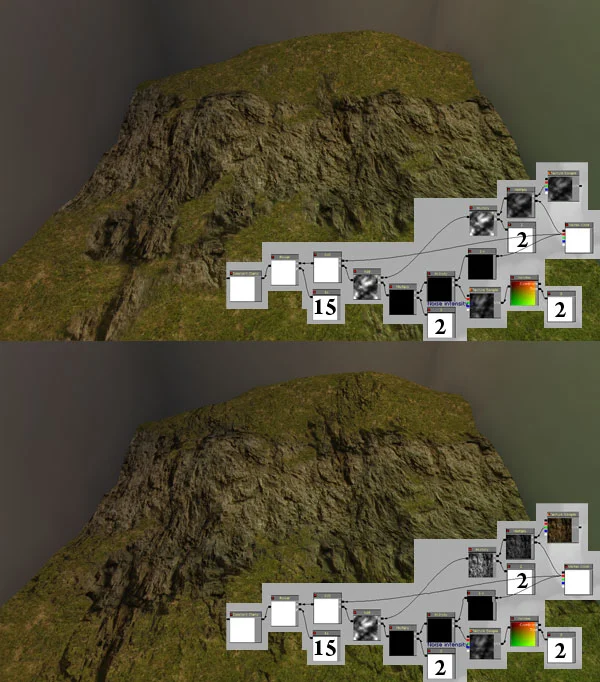
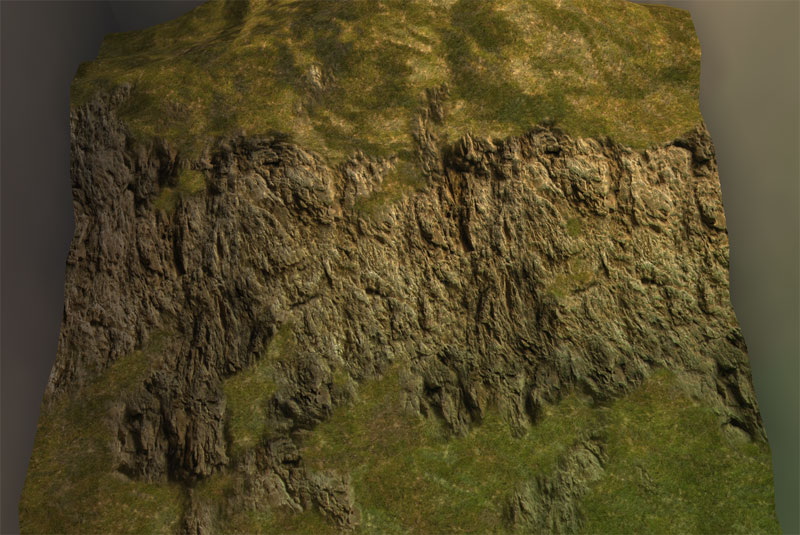
The top image is the default shader covered at the begining of this tutorial, but the bottom image uses the diffuse texture as a 'mask'. Doing this will allow for the textures to actually controll where it is cut off.
Experiment a little and find something that works best for you based on your situation, Remember that assets are rarely ever the exact same and almost always needs a personal touch to add character.
With some minor lighting tweaks and shader aulterations such as adding a larger normal map for the grassy areas, the results can be rather pleasing. This is the final render i got after tweaking with the shader network for a few minutes.
Best of luck with your shader work.
I hope this tutorial has helped!