UT3: Basic outdoor lighting tutorial
Your first instinct for creating an outdoor lighting would be to use the 'Skylight' light source; however this is miss-leading. The suns light rays do not taper as they come to earth (relative to our size compared to the distance the sun is from earth. They do taper in reality, but so little, you can hardly notice. In any game engine, treat the sun as a light source with no tapering at all.) Because of this, we should not use a 'Spot Light' to begin with, but rather we should put a 'Directional Light' into the scene as a primary light source. Skylight will be used later on, but as a fill to brighten up the darker areas of the map.
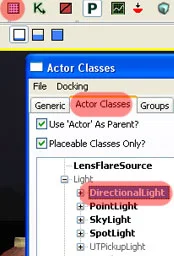
To insert a new light into the scene, click on the "Open the Generic Browser Window" button located on the top menu bar in the UT3 Editor. Once the Browser Window is open, click on the second tab from the left labelled "Actor Classes". Click on the "Directional Light" option with the "Light" menu and close the "Browser Window"
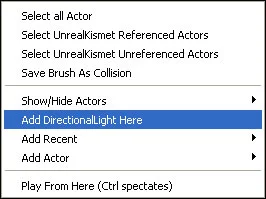
Right click in the area of the map you want the light to be placed and scroll down to "Add Directional Light Here". This option only exists because "Directional Light" was last selected in the 'Generic Browser Window' before it was closed. This light will become your primary light source.
By default the light will be pointing straight down the Z axis. Due to Z-Fighting issues, it is highly recommended to rotate the light at least a couple of degrees, even if it is mid day, it is best to give a small light angle to avoid this issue. Remember that this is a directional light, so it does not matter where it is located in the level, as long as it is pointed in the correct direction based on the main light source in your sky box.

With your new light created and selected, press the F4 button on your keyboard. This will open up the options of the light. Scroll down and select the "Light" menu. By default "cast dynamic shadows" will be selected. It is a good idea to turn this off due to extreme processing that would follow since this will be cast on everything, even the interior parts of buildings that do not need it.
Next put the brightness to 1.5, and change the light color to something closer to what you want. I used the following settings for my color.
R: 236
G: 228
B: 167
If you bake your lights/scene, you should get something like this.

Sure, the scene is lit, but not very well. If you take a look outside, you will notice that shadows are not 100% black, but rather there is a slight blue tint to them due to the ambient lighting from the entire sky. The sky being black causes most shadows to be black, and I say most because if you're inside a building where no natural light can reach, it will be pitch black, unless there is an alternate light source.
Well, here is an easy way to fix this little problem. Take the light you had and duplicate it out. Try to keep the lights close together since they will all directly influence one another, and it's nice to keep them located for easy editing.
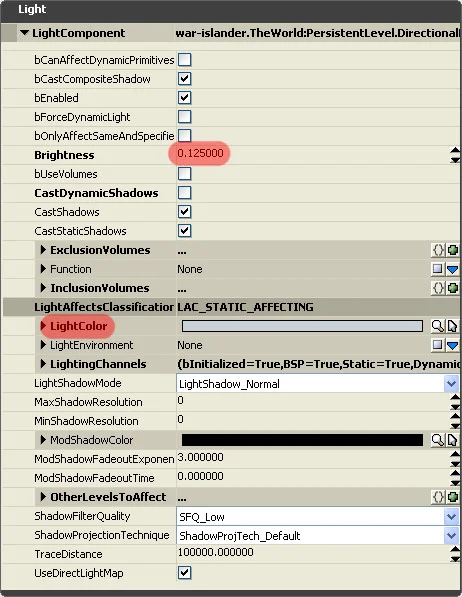
Since the exact same settings exist as the primary light source, all you need to do is change the brightness to 0.125, and change the light color to a very light blue to simulate the ambient lighting of the real world. I used the following settings for my color.
R: 200
G: 209
B: 215
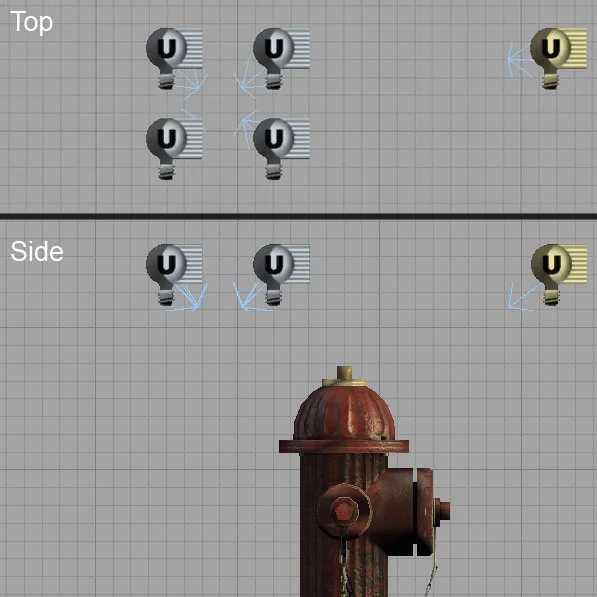
You will need to duplicate this light out so there are 4 in total and rotate them to the appropriate directions. From the top, they will all be pointing in at a 90 degree rotation from each other. This does not need to be exact, but keeping it close is always a good thing. From the side view, they will need to face in, also at roughly a 45 degree from the global orientation.
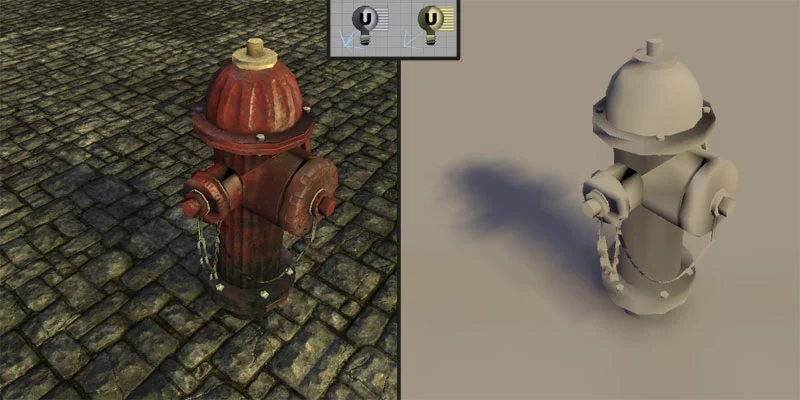
The result of adding 4 fill lights is shown below with a 'Before and After' image.
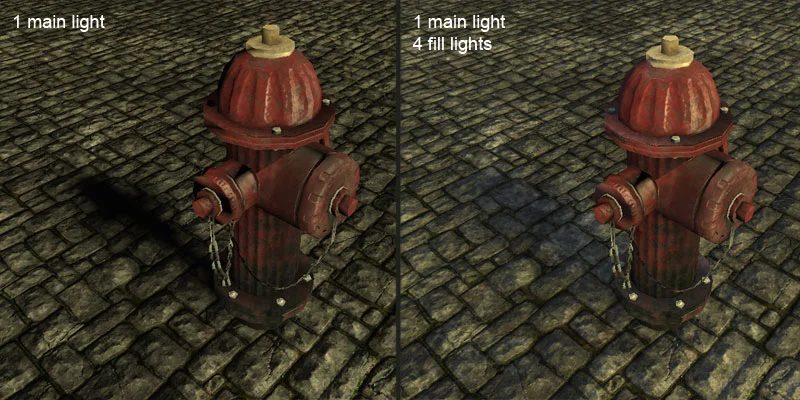
The image on the left is the original with one main light, and the images on the right is the scene lit with one main light and 4 fill lights.
As you can see, the overall shadows of the fire hydrant are much more believable, being able to see details underneath the baked in shadow.
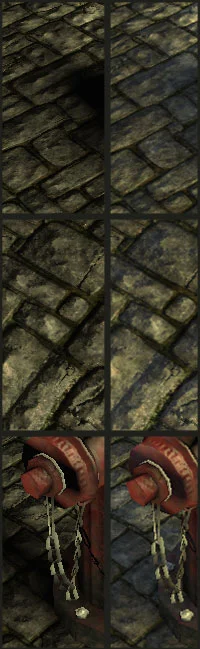
The bricks now have multiple highlights, but still have darker shadows where the normal map pushes far enough in. As seen in the image above, even in shadows you will now have detail.
Geometry placed into the scene are a tad bit lighter, so if the entire scene is too bright, try turning the main light source down a bit first before touching the fill lights too much, but adjusting both together is always allowed.
(On a side note, if you select all 4 of the fill lights at the same time and hit F4, you can change all their attributes since their settings are exactly the same to begin with. this will save time in the end)
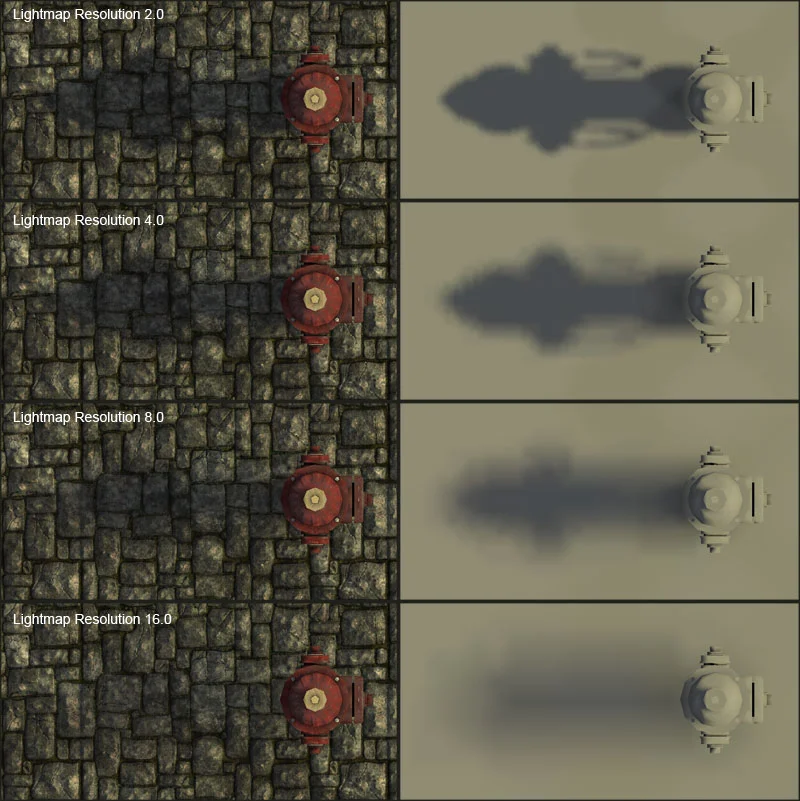
Detail Of Baked Light Map
Many times you will have an issue seeing your shadows. If your geometry is too small, or the lightmap for your geometry is too small, it will not show up the way you would like.
An example of this is when you create anything using the 'Brush Builder', there is a setting per face you can set for the resolution of the lightmap. Simply click on the face you want to change so it highlights blue (if it does not turn blue, change to either 'Unlit' or 'Lit' mode to see it). Hit F5 on your keyboard to get the 'Surface Properties' menu. To the right you will see a 'Lighting' sub group one pull down selector and 3 checker boxes.
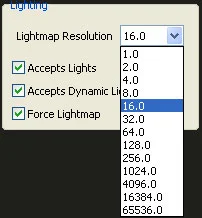
'Lightmap Resolution' defines how dense your lightmap will be, the lower the map, the more detailed it will be. An example of this will be shown below. Each render has the shaded version and a greyed out version side by side so you can better see the level of detail they have. There are only 4 in total. The resolution settings from top to bottom are 2, 4, 8 and 16. By the time it gets to 16, the detail level is so little it is hard to see in the textured view. Remember, the more detailed your light maps become, the more memory you will be using, and the longer it will take to bake and load, so be careful when using this function that you don't go overboard all around the level you are creating.
In part two I will cover a large issue not covered in the first tutorial. With a scene containing only one asset, and something as small as a fire hydrant, it is easy to get the results you want, however when you are faced with a street with a lot more area covered in shadows, a rather large problem arises which I will be covering in this tutorial.
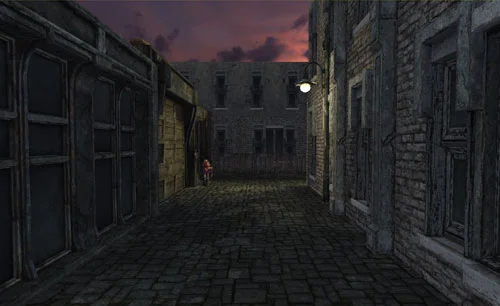
This is a relatively accurate desired look to a piece of level. Please note that I quickly mocked this up, so not everything is accurate, but it will give you a better understanding of some issues moving forwards. Like I said, the image to the left is the desired look we're aiming for, however, with the light set up we had before, the following image is the result we get.
Compared to the first image, this lighting is far too dark. You do not see any details in the shadows, also there is no spec or highlights on any of the un-lit surfaces. Here is a method you can use to help fix this issue.
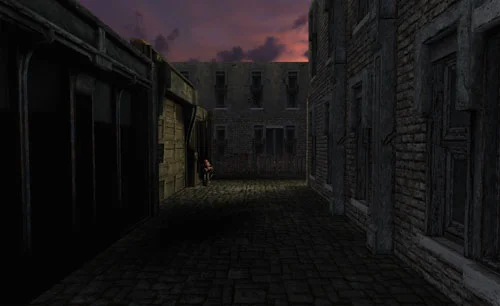
Go into your "Generic Browser Window" and select a "SkyLight" from your Lights menu. Change all the asset properties to the SkyLight to what you see on the left. What this will do is fill in your all the dark areas and even out the overall look of the shadows.
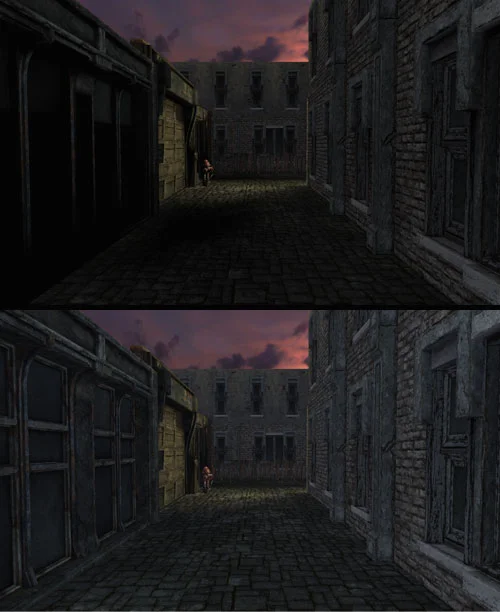
As you can see with the before (top) and after (bottom) images, the results are quite noticeable. If for some reason you want the shadows darker, by all means, play around with the settings and get something that's right for you, just remember to bake your lights after changing any settings or nothing will update accurately.
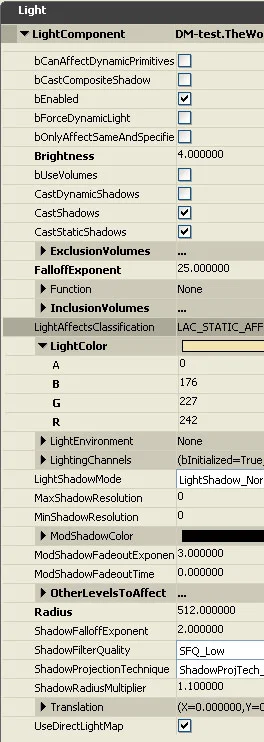
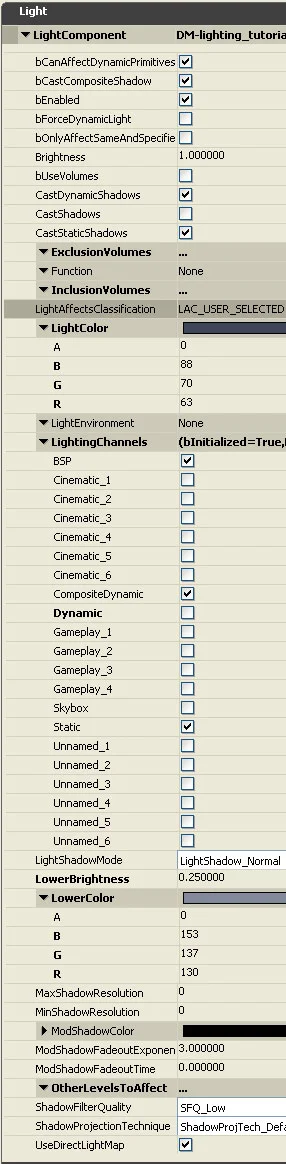
On a side note. The setting for the light placed by the street lamp in the scene is what's displayed on the image to your left. Any shaded area should always have some sort of alternative light source shining somewhere, mainly due to the fact that the shadows will look much more interesting with highlights and contrast. Without an alternative light source, everything will have a bit more of a flat feel to it.
Again, I strongly encourage you to play around with the settings and get something you like, and what best fits your scene. Everything you see here is just a basic starting point, nothing more.
I hope this little tutorial has helped you out. i thank you for your time.