UT3: Dynamic cloud shadows

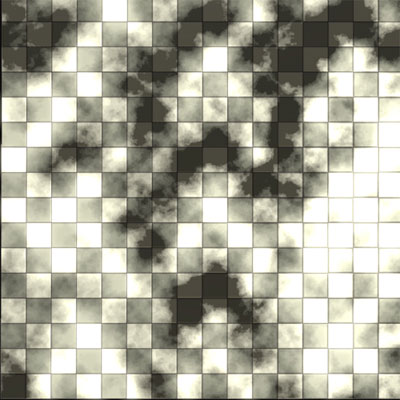
Note: The image above is an extreme to show the difference between the non shadow version and the one with the cloud shadows.
Before starting this tutorial, you will need to set up a lighting system that will work correctly and accurately to what you'd like. This will work for both spotlight sources, and in the example I am using, Direction lights work as well.

First, you need to create a cloud texture that will work for your scene. For this I used the 'clouds' option in Photoshop. I know, I know, the Photoshop filters can be terrible; however I’ll explain why I used this filter instead of creating my own.
• The clouds filter in Photoshop creates a seamless texture to work with.
• You can press 'Ctrl+F' on your keyboard until you get the result you want, and it is fast and easy to do.
• The way we will be using these textures is 'adding' them together with in the UT3 shader network to achieve the result we are looking for.
• Every time you create a texture using this, it is soft and gradient. Later on we will be controlling the sharp edges and how they fall off, their brightness and their shadows.
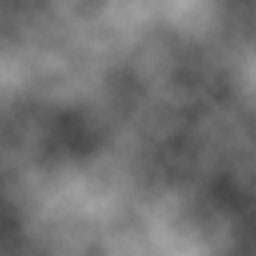
This is the image I created using Photoshop.
Now, to create a light material.

In the 'general browser window', right click and create 'New Material'.
Bring in your texture and hook it up to the 'emissive' channel in your material.
Lights do not lighten the scene with the diffuse, but rather the strength of the light. Think of any color you can; that color cannot exist unless there is a light strength value, that is what the emissive channel does for lights.
Select the material itself (image eg. Preciewmaterial_6) and under 'lighting model' select 'MLM_Unlit', scroll down and check off 'Bused As Light Function' (first option under 'Usage').
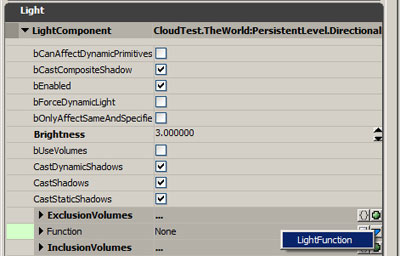
Next, you will need to plug this material into your light channel. With your light selected, press 'F4' on your keyboard, navigate under the 'Light' sub menu until you see 'Function'. To the right, you will see a blue arrow pointing down; press that, and the 'Light Function' which drops down after.
After selecting 'light function', you should see this.

With your light material selected, click on the green arrow pointing left beside 'Source Material'. You're done; your material is hooked up.
Make sure you plug it into the light which casts the shadows for your scene if you are making an outdoor scene. The reason for doing this is so the shadows of the buildings and the shadows you are creating for the clouds match exactly.

Yes, it will look nothing like clouds, and it will not animate, this is just the first step to see how the light works with your scene.
Baby steps.
Next, we will be animating the light to get an idea of the speed and angle we want. We do this first instead of overlaying the clouds because both the clouds will be moving in roughly the same direction, with a slightly different speed and angle to add variation, plus we need to see how the cloud textures play with one another in the editor when it is being animated, not when it is stationary.

To animate your texture, add a 'Panner' and 'Tex Coord' to your scene.
The 'texcoord' is only used to scale up or down your texture in the scene; the panner is used to translate the texture.
For the panner value, I set my angle and speed to “SpeedX – 0.01 SpeedY – 0.05”
Note: the settings you plug in to 'panner' is directly related to the rotation of your light, so if you want the angle of the shadows translation to change, then you can toy around with the different variables in 'panner', or simply rotate your light. Make sure you rotate it using 'local' setting to make sure the global angle does not change, and shadows fall in the exact same way. Also, for a directional light, the height of the light itself does not affect the shadows scale.

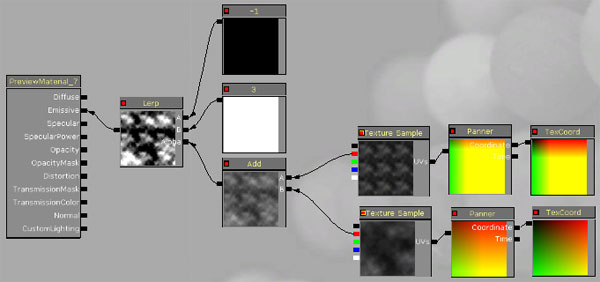
Next, you will need to duplicate the texture, panner and texcood nodes in the material shader, and plug both into an 'Add' node, which then plugs into the emissive.

The second texture should have a different setting in 'texcoord', and the direction should be slightly different so they are not moving in the exact same direction.
With these slight changes, the clouds will soon have much more variation, as well as a LOT less repeating (mainly due to the scale of the textures).
Do not scale your clouds down by half; find a value that does not go into the size of your original texture scale.
eg. If the first is set to repeat 3 times, the second should be around 0.85 or 1.35. They will have to repeat a bit more often to multiply into each other, resulting in variation.
As of right now, there is more variation, however we will want to tighten the gaps and adjust the light and dark areas a bit more to achieve a better result.
To do this, we will need to add a Lerp and 2 'constant' variables to the scene. Plug the 'Add' variable into the 'alpha' of your lerp, and each constant goes into A and B. What this will do is the black and white cloud textures will be multiplied by the A and B values. For this example I set the constant plugged into the 'Lerp A' channel to -1, and the constant plugged into 'Lerp B' was set to 3. The lerp then is plugged into the ‘Emissive’; however a problem might come up. When dealing with a lerp, you can only have a black and white channel to drive the alpha, so you will need to plug the red, green or blue channels of the cloud textures into the 'Add' variable instead of the entire texture.
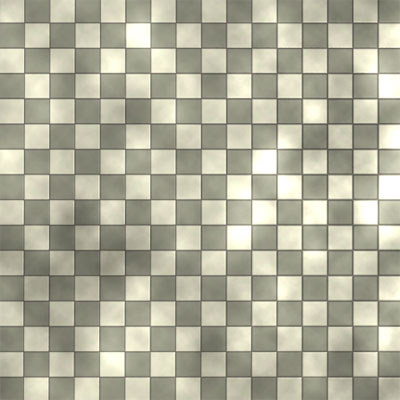
This is the result you should achieve with these updates. A lot closer to more realistic clouds, however there is one big issue. If you look at the clouds before this last change, there is not a lot of detail; however, it does not glow. What this last step did was it amplified the colors, and the more they are apart from each other (currently by a total of 4) the more extreme they become, and the tighter the shadows and light areas are.

This example has the 'constant' variables set to 12 and -4, 4 times as high as the last one. As you can see, the clouds are much tighter, but the lit areas are MUCH brighter.
Note: the shadow color does not change because you cannot get a shadow darker than 100% black and the fill lights lighten these areas, so no matter how dark you make this light, these shadows will always be this dark. To adjust these, change the fill lights.
The best way to fix this issue is to balance your constant variables so the white is not too bright, but if you want a larger gap between shadows, sometimes there's no other way but to set this value high.
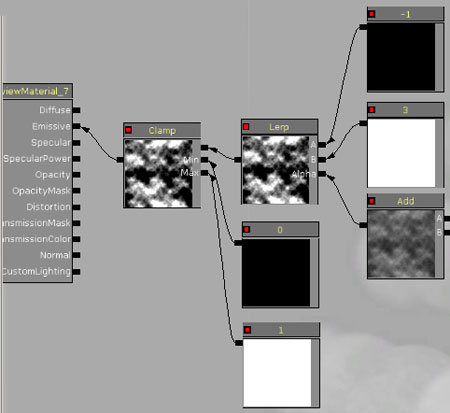
The other way to fix this is to create a 'clamp' and two more 'constant' variables. The 'lerp' should be plugged into the first channel on the clamp, and each constant into the 'Min' and 'Max' channel, and the clamp into the emissive. What this 'clamp' does is literally clamps the value to the min and max settings. Keep min at 0, but change the constant plugged into max to 1.
When you save the material, you won't see any change right away, but when you change it to 0.75, 0.5 or 0.25, you notice a big change, especially the lower you go.

Since the ground is white and grey to begin with, in this example it is hard to tell exactly how it will affect your environment, but a good way to see the changes in this image is the material preview box. As the white color is lowered, it does not lower everything uniformly, it simply clamps the color at that value based on the texture, so you will lose detail in the transition from light to shaded, creating a harder shadow edge (usually more pixolated) so be careful when tweaking this value.
I hope this little tutorial has helped you out. i thank you for your time.