UT3: Foliage Factory
This tutorial will go over some basic methods for using the 'Foliage Factory' to create such things as a scatter of bullet cartridges on the ground, or patches of grass without having to place them individually.
In a way, this function closely resembles using decals; however instead of projecting a material, you are randomly organizing 3d geometry on flat and bumpy surfaces.
First you will need to scale and create a brush to the size you want. In this example I will cover grounds and 3d intricate objects such as rocks as well, but for now, let’s just work with a flat ground plane.

Once you have the size you want to cover, right click on the 'Add Volume' button, and scroll down till you see 'Foliage Factory'.
Make sure the ground you want to be affected is within the brush size, if it is not, these areas will not receive anything.
Off the bat, you will not see any change to the ground, that is because you need to add geometry to your 'foliage factory' options.

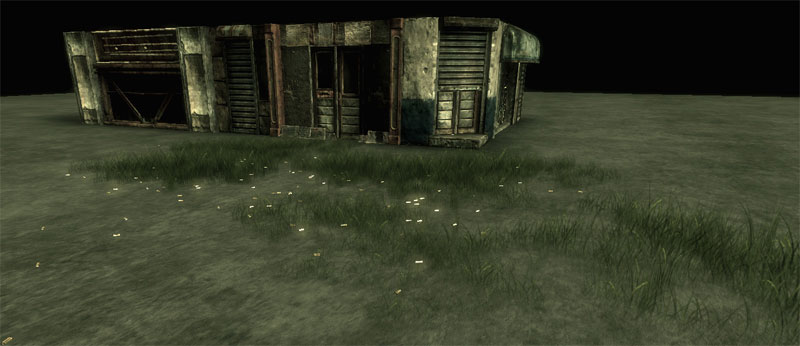
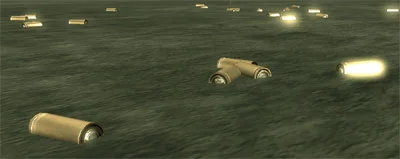
I will create a scatter of bullets first on the ground. The bullets I used are located in your 'Generic Browser Window' under the 'WP_Enforcers' pack in the mesh sub category.
With your 'Foliage Factory' actor selected and the options opened, press the green check mark located under 'Meshes' in the foliage tab. With your bullet selected, click the green arrow beside the 'Instance Static Mesh' option. This will place the geometry you have selected (the bullet) randomly based on the options you have in selected in the options panel.
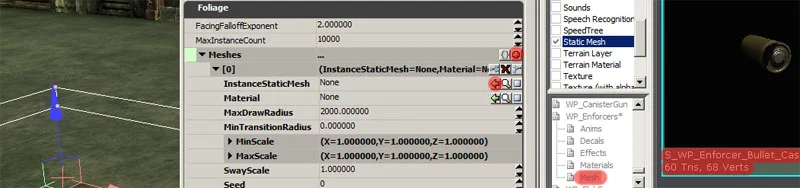
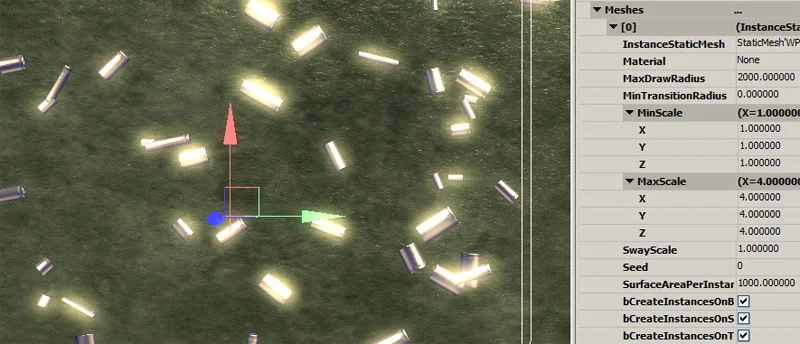
If you zoom in on the bullets, you will notice that they are not resting directly on the ground, but rather they are 50 in the ground. This is caused by the pivot point of the asset that is being referenced. The 'Foliage Factor' randomises the rotations of every asset, but it does not randomise the height. The pivot of each asset is what snaps to the ground. If you ever create assets for this actor, keep this in mind.
Under 'MinScale' and 'MaxScale' within the properties, you can randomise the scale of the assets to a min and max size, or in this case, while dealing with bullets, all of them will be the same. In this case, if your asset is too large or small, simply match the value for both min and max, and you can scale up or down your assets uniformly.
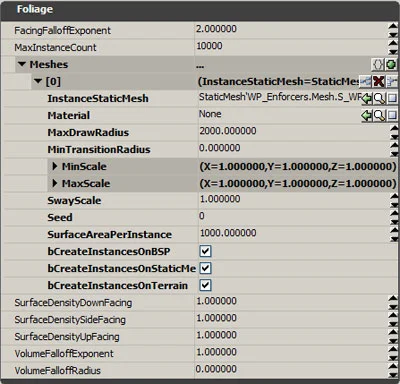
When you build your level, using BSP's for certain areas, Static mesh and Terrain is a great way to utilize this tool to its max. There are 3 options with check boxes allowing you to create this mesh on selected types of geometry the engine handles.
This will allow you to put snow on the tops of buildings, but not the ground which may or may not already have a snow texture. You can create grass for the terrain, but any static mesh will not receive the grass geometry.
The explanations of these options are provided by
Static Mesh:
What static mesh it will use for the Foliage Layer.
Material:
This property is optional. If you leave it empty it will use the material specified in the properties of the static mesh. If you fill something, it will override it.
Max Draw Radius:
At what distance the foliage meshes should start disappearing, for performance reasons. A couple of thousand should do.
Min Transition Radius:
Until what distance the foliage meshes should be displayed full scale. The bigger the difference between MaxDrawRadius and MinTransitionRadius, the softer the fade out. Can be left at 0.
Min and Max Scale:
The size of the foliage meshes.
Sway Scale:
In combination with the WindDirectionalSource actor. This controls the amount of influence the wind has on the foliage meshes.
Seed:
Can be left at 0. Other numbers will randomize the placement of the meshes differently.
Slope Rotation Blend:
The rotation of the meshes dependent on the angle of the terrain quad below.
To illustrate how the fade in and out works with this actor, I created two trees within the 'Foliage Actor'. Normally this tool is used for small things or details such as swaying grass in the wind, but to push this point, I created trees.
The image below shows the trees close up to the wall of the building at regular size. As the camera is pulled back, the trees begin to shrink. Eventually, based on the 'Max Draw Radius', the trees will disappear and shrink so small you cannot see them. This method works great for smaller props, but is not ideal at all for larger assets, such as trees.

To add another piece of geometry for this actor, simply click on the plus button again under the 'Meshes' section.
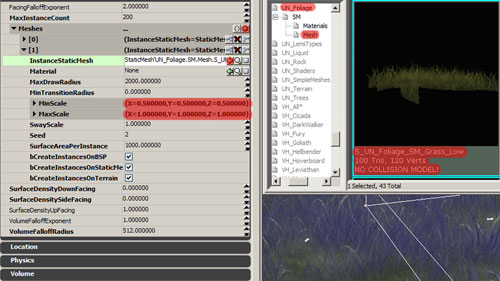
Unreal has a foliage pack with a broad selection of plants, trees, grass, weeds etc.
The package is called 'UN_Foliage'

To help illustrate how this function works on 3d objects (tops, sides and bottoms) I will be using this bullet shaped object shown above. Each side is different, so it will be easier to show how the surface normals inherit the geometry, and how the geometry rotates.

With this image, you can see that every single object is facing outwards with its original 'Top' view showing. This will come in handy later on if you want to add something like mussels to the base of a docked boat. The mussels will rotate randomly, adding variation, but they will all be facing outwards.
Let’s change the object to something else and go over these options.

All 3 of the top options in a nut shell are down, side and up; these refer to the normals of the faces based on the world orientation. Since this geometry we will be using is a rock with a hole in the middle, it covers all 3 of these options. Let’s take a look at the down facing option.
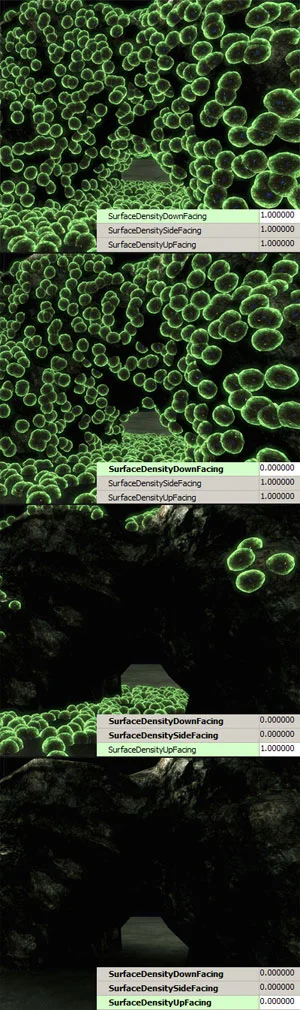
From the top to bottom, these images show the difference when changing the 'surface density (down, side, up) facing' attributes.
There is not a big change between the first two because the base of this geometry is not perfectly flat, so to illustrate that better, the image below is set to 1 for 'down' and 0 for 'side' and 'up'. Here you will see how it works.

Playing around with these settings to get the result you want is encourages.
A good resource to cover much of this tool is located here
I hope this little tutorial has helped you out. i thank you for your time.