Adding variations to a repeating brick texture pattern

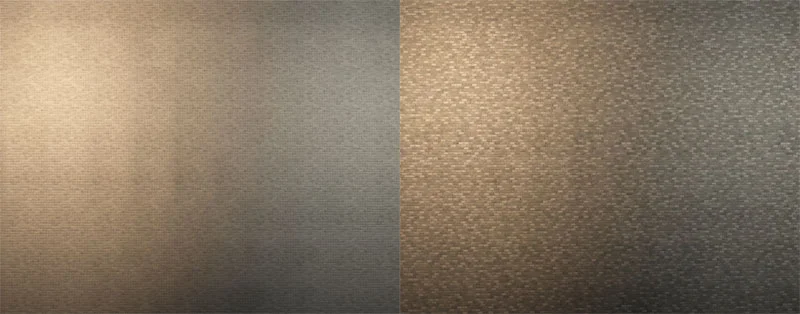
When creating a brick texture, you run into one main problem. The pattern of the texture always seems to repeat very obviously. This is quite often covered by windows, awnings, balconies, decals and many more assets, however if you have a massive wall just for the sake of argument, left side of the image above is what you might get, however with only one extra texture, you can get the variation you see on the right.
From far away it does look noisy, but if we zoom in, this is what it looks like.
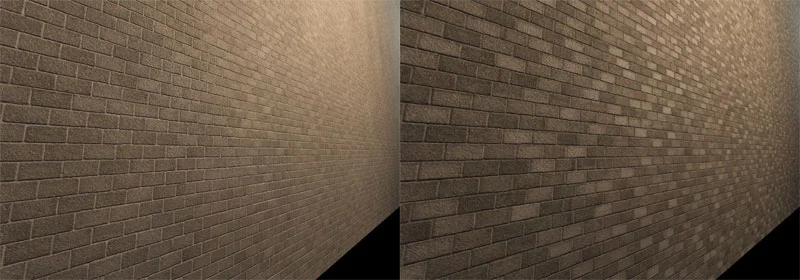
The variation in the bricks on the right make it much more interesting up close than the bricks on the left.
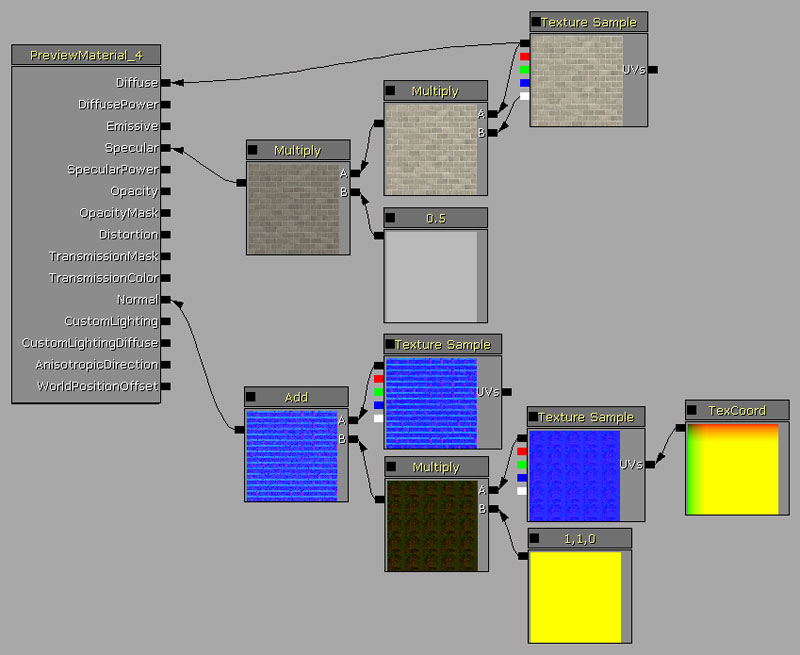
The image below shows the final 'brick variation' shader that you see on the right.

Since you can see the final result of how the shader is constructed and what it looks like in the level compared to the old brick shader, I will go through how to construct the textures, what to look out for, and how to set up the shader and what it does in the level.
To better understand the methods for texturing, lets cover the shader first.
As you can see above, the 'brick variation' texture is multiplied by the original brick pattern. When anything is multiplied, any white value keeps the original texture un-changed, however the darker an area on the variation texture, the darker that becomes in the final render.
The whole reason why the brick looks so bad to begin with is because the 512X512 texture is repeated so much. To get around this problem, the pattern which is multiplied over the original is 4 times as dense and will be repeated at a UV of 0.25, causing it to repeat once for every 4 times the brick is repeated. This allows for a more broad repetition of the brick. This might sound confusing, but let's create the textures and go from there. it'll become more clear as this tutorial goes on.

Firstly, you need a brick texture. The key here is to keep the brick fairly clean and even since the colors will be added later on with the 'variation' texture. Make sure you make this texture repeatable.

Next you will need to create a normal map. A quick way of doing this is to invert the texture (since the grout lines are whiter than the brick) and play around with the levels until you get an image close to this.
From this point, take the pencil tool and fill in the missing brick grout lines with a solid black value. Likewise, paint in the middle of the brick so you will have a white value. the resulting texture should look something like this.

Using either crazy bump or the Nvidia Photoshop plug-in, create 2 normal maps. One normal map is created with this texture which will cause strong grout lines, and the other will be created using the original brick texture to get the brick variation itself. After all of these are done, Overlay one of the textures over the other.

When you do this, you will notice that the normal map on the bottom will become a bit dimmer than before, This is because some of the blue value will be copied over which represents a flat surface. To remove this, double click on the normal map on top and under the 'advanced blending' turn off the blue channel.

Save out the textures and import them into the UT3 or UDK game engine. Make sure to use the proper settings for the normal map otherwise it will not work correctly in the engine.
Creating the shader for the basic brick texture:
Create a regular material for the brick and attach the diffuse and normal to their appropriate channels. For spec (quick and dirty) I saved out the diffuse with the black and white texture used for creating the normal map as an alpha. If you want you can create a spec texture of it yourself, but for now this is what I have set up in case you're wondering what the alpha is. Here is the shader.
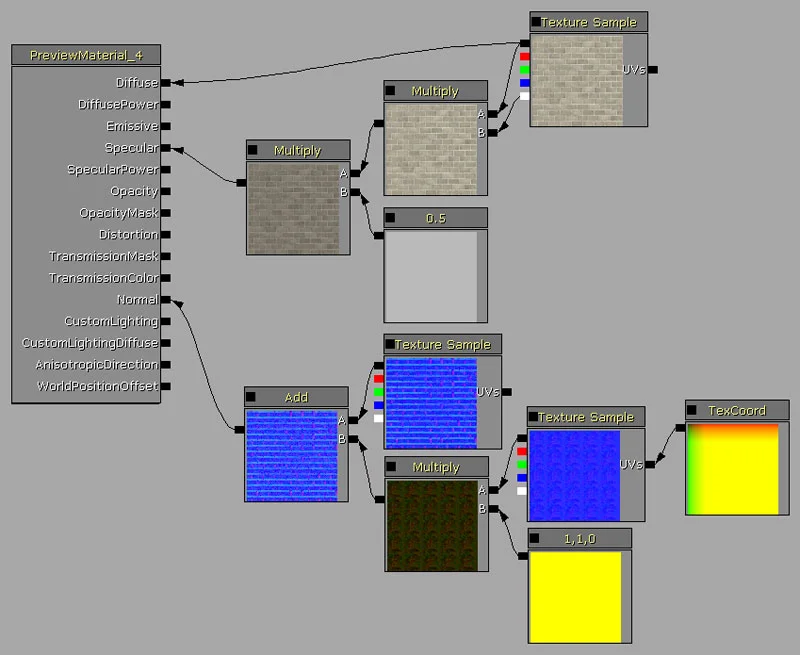
The diffuse texture is self explanatory, but for the spec I multiplied the diffuse by the alpha which I mentioned above. Since this texture has a black value for the grout, it will make those areas black resulting in no spec. This will simply make the bricks stick out that much more in game. This is then multiplied by 0.5 to make the spec a little less pronounced.
For the normal map, the second texture you see on the bottom right most area is simply there for details with a repeat of 5 for both the U and the V. This adds a little more detail when you get closer to the brick.
This is the resulting shader on a BSP.

Not the best result. You can clearly see the repeating texture. Aside from this method I am covering here, the only other ways to get rid of this obvious look is to A: use a larger texture, or B: cover it with decals or other geometry.
On a side note, if you increase a texture from 512X512 to 1024X1024 which is the next step up that UT3 can read, it does not double the textures size, it actually quadruples it. you can fit 4 512 textures in a single 1024 texture. The method I'm covering calls for only two 512 textures, which when compared to a 1024X1024 is actually half the space. Also if you choose to use the original brick for whatever reason, it is not 'damaged' in any way, so it's still usable. On top of that, the "variation" texture can be used on other bricks providing the bricks themselves are the same.
Now let's create the variation texture.
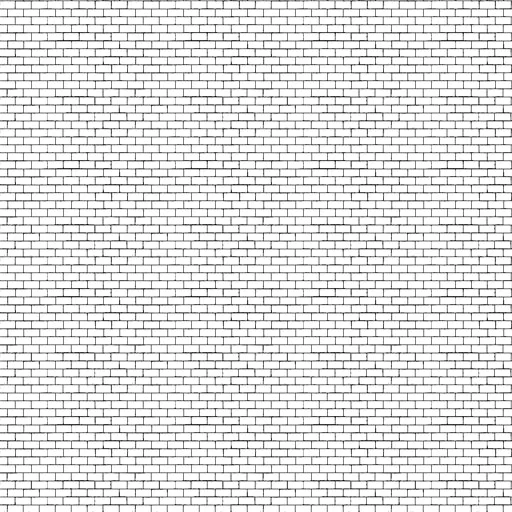
First, take the black and white we used to create the normal map and change the 'image size' to 128X128. This will cause the texture to be a quarter the width and a quarter the height of the original size. (1/16th of the original texture)
remember when I said that using a 1024X1024 will be 4 times the detail and 4 times the hard drive space? Doing the shader this way will allow you to color the bricks at half the hard drive space but 16 times the detail.
Take this texture and copy it into a 512X512 canvas and duplicate it 4 times horizontally and 4 times vertically so it takes up the entire 512X512 texture space. Make sure you collapse this into one layer.
This is what you should have.
The next step is to find some textures that give different colors. since these are bricks, I used other brick patterns just so the brick colors and patterns are something that exist in the world already. Here is an example of the textures I used.

With these textures, we will be 'masking' out the areas we want. the reason why we 'mask' the textures is so the base brick patterns are not damaged in any way. Also since the bricks loop horizontally, make sure that these textures can be repeated sideways, otherwise you may get some strange results.
To mask your texture, use the 'magic want' to highlight random white areas of the black and white brick pattern. when you're done, hit the 'Add Vector Mask' button. The texture might mask the reverse, so you can simply 'invert' the selection. This is what one layer should look like.

With 6 different layers, you should have something similar to this.
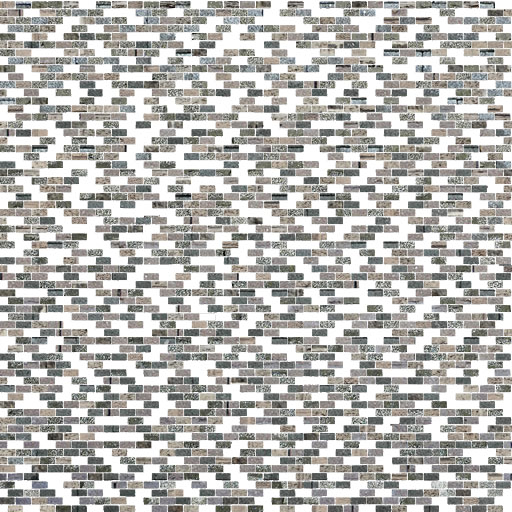
Next you will need to tweak the levels so when you 'multiply' this texture by the original brick pattern the difference is not too strong. In order to keep all of the texture information, I used a "Levels Layer" which can be found here.
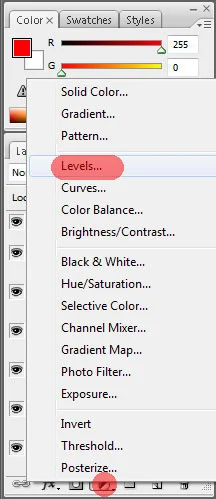
When you double click on this layer, you can tweak the levels of all layers beneath it. Bring up the black value so the textures are much more white. This is the final texture.

Now let's import this into the game engine and work with the shader.
Again, this is the final shader.
simply change the UV's to 0.25 and multiply the 'brick variation' texture by the original brick. That's it, you're done. The ending results give a huge variation change and a much more believable feel to your game.
Again, here is the comparison between the original and the newly tweaked version.

I hope this little tutorial has helped you out. i thank you for your time.